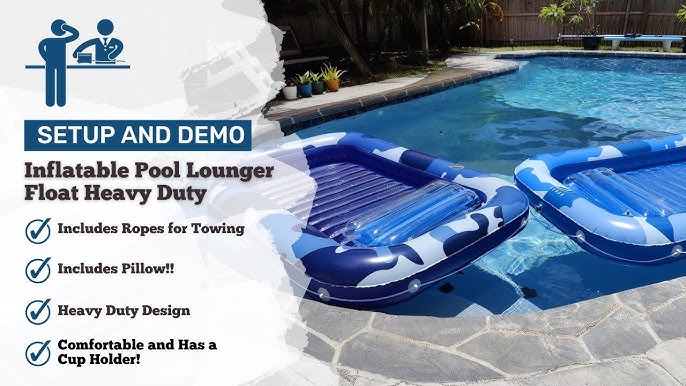
Alright, so today I tackled setting up those massive giant floats everyone keeps showing off in their pools. Honestly, looked way easier in the pictures than it actually was. Buckle up for the real deal.
Getting the Beast Out
First step, wrestling that float out of its packaging. Mine arrived rolled up tighter than a cigar and wrapped in this industrial-strength plastic. Seriously needed kitchen scissors to break in. Had to lay it out flat on the patio first. Word of advice: Clear a HUGE space first thing. This thing unfurled like a giant inflatable carpet and almost took out my potted plants.
The Scrub Down
Man, this float smelled like a chemical factory. Figured I should wash it off before putting it anywhere near pool water. Grabbed the garden hose, a bucket of mild soapy water, and a soft sponge. Did both sides, paying extra attention to any fold lines where dirt might be hiding. Rinsed it super thoroughly. Nothing worse than soap scum mixing with pool chemicals later. Left it in the sun to dry completely for like, half an hour. Patience is key here.
The Inflation Saga Begins
Fired up my trusty electric air pump. Found the valve – it was the big one, thankfully, not one of those tiny pinchy ones. Plugged it in and started pumping. Oh man, the noise! Sounded like a jet engine warming up. The float started inflating slowly… super slowly. Had to keep shifting the nozzle to keep a good seal. Felt like it took forever. Big Learning: Your standard little float pump might just die trying. You need an air pump with some serious grunt.
Patience & Pumping
Kept at it. Watched the wrinkles slowly disappear. Stopped periodically to feel the firmness. Critical part: You don’t want to inflate it rock-hard like a balloon. When it felt firm but still had a little give when I pressed down, I figured that was about right. Overinflating feels risky with seams stretching. Shut off the pump and screwed the valve cap on tightly. That beast was finally ready.
Getting It Into the Water (The Workout)
Now the fun part – moving the inflated monster. My float was easily the width of the pool steps. Had to very carefully lift and shuffle sideways towards the pool. Almost slipped on a wet spot near the edge – that would have been disastrous. Gently, I mean really gently, slid it into the shallow end. Let it float for a few seconds to settle before giving it a little push out towards the center. Pure relief seeing it just float there peacefully after all that wrestling.
Testing the Waters (Literally)
Climbed in cautiously. Getting on required a bit of awkward scrambling and pulling myself up. Once I was sprawled out, it was total bliss. Super stable, felt like a floating island. Minor adjustment needed to stay perfectly centered, but nothing major. Spent a good chunk of the afternoon just chilling.
Real Talk Tips:
- Space is Non-Negotiable: You need way more room than you think for unpacking and inflating.
- Wash It First: That factory smell isn’t poolside ambiance. Wash it down.
- Get Muscle or a Beefy Pump: Your little foot pump is not gonna cut it. Get an electric one with decent power.
- Firm-ish, Not Bulletproof: Overinflating feels like tempting fate. Aim for firm with a bit of bounce.
- Move Like You’re Handling Explosives: Seriously, one wrong step transporting the inflated float is potential disaster.
- Patience is Mandatory: From unrolling to inflating, everything takes time. Don’t rush it.
Yeah, it was a bit of a project, way more hands-on than just tossing a noodle in the pool. But seeing that giant turtle or flamingo chilling in the water? Worth the wrestle. Enjoy!